
COSTUME DIY: Sculpted Spirit Animals Masks
For these Sculpted Spirit Animal Masks, I partnered with Oriental Trading to provide the mask bases and capes. Last year, I taught teenage students how to create masks and animals using the same materials I used for these masks, expect we used different paint. Way back in 2010, I made this Sugar Skull Mask to fit my daughter's face. While I think molding a face is cool, building on top of an existing mask base is more stable and lessens warping. For these masks, my daughter picked a fennec fox and I chose a deer. You could chose any animal that will work on a human mask base.

SUPPLIES:
Oriental Trading provided me with the cloaks and mask bases. DecoArt provided me with most of their paints that I used. All images, thoughts, opinions, and instructions are my own. Some of these links are Amazon Affiliate links. Any purchases made using those links will result in Amazon paying me a small commision.

1) With sharp scissors, cut across the mask below the cheeks and nose.
2) Draw a curved long ear from the food boxes. Cut out the ear and use it as a template for the 2nd ear. My animal ears are asymmetrical, so more of the inside shows. There should be a left and right ear. Curve them in half, creasing the bottom. Attach the ears to the top of the mask base using masking tape.
3) Using more food box material and masking tape, form a nose that fits over the human nose and along the slope of the face.
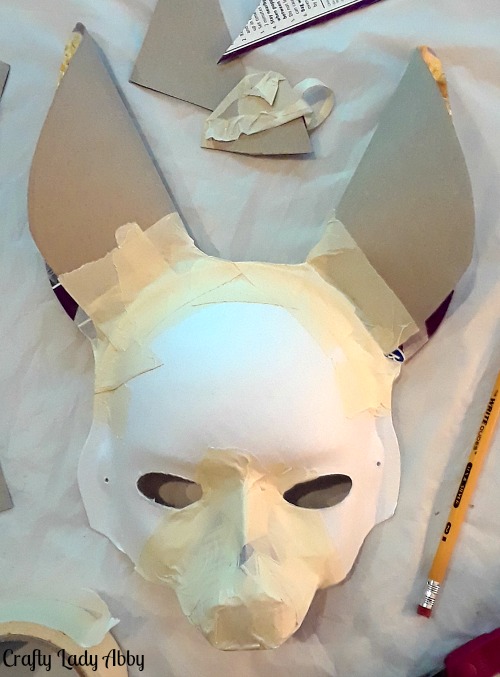
4) Cover your work surface with a plastic tablecloth. Cut the plaster cloth into strips and squares. I keep my strips about 1"-2" wide and cut smaller squares as needed. I like to put my cut strips in a pile. It's easier to cut strips ahead of time instead of while sculpting, as things get messy once sculpting. Excess strips can be stored in a plastic locking bag or closing container. If you don't like messy hands, put on plastic gloves.
5) Dip a strip into the bowl of water. Using your fingers, squeeze off the excess water while keeping the strip straight. Mold the strip over the mask. Work one strip at a time, until the whole mask, including the ears, nose, and back, is covered with overlapping strips. Use smaller pieces to wrap around the edges and sides. Apply 2 layers of strips, for extra strength, letting the 1st layer dry to the touch before applying the 2nd layer. Use the paper towels to dry off your hands and work surface as needed. Prop the mask up, so air can circulate on all sides. Let fully dry. Depending on how wet the strips are, drying can take 1-2 days. The mask will be lighter and hard once fully dry.

6) Use a paper plate as a paint palette. Using Oyster Beige, paint the lower fox face. I painted the inside of the mask with Oyster Beige too, but this isn't necessary. Using Honey Brown, paint the upper head, outside the ears, and inner eye stripes. Using Purple Pizzazz, paint the inner ears. Using Oyster Beige and a small brush, edge paint the ears. Using Lamp Black and a small brush, paint the eyes and nose. Let all of these base layers dry.
7) With Champagne Gold metallic, paint over the Oyster Beige sections. With Emperor's Gold metallic, paint the Honey Brown sections. Go over the upper head section with Bronze metallic paint, leaving a strip of Emperor's Gold showing.

8) Mix equal parts Purple Passion and Purple Princess Glamour Dust together on the plate. Cover the purple inner ears with the glitter paint mixture. Let it dry and apply a 2nd coat. Paint the black sections with two coats of Black Ice. Paint the Champagne Gold sections with Champagne Glamour Dust...bet you saw that coming.

9) Using the screwdriver, gently pierce small holes through the mask sides. Insert ribbon or elastic through the holes. For elastic, try the mask on, and adjust the elastic to fit snug enough for the mask to stay on easily. For ribbon, put the mask on and decide how long the two ribbon pieces should be for the mask to tie in the back. Tie knots on the mask to secure the ribbon or elastic to itself. If this mask will get a lot of wear, consider sewing the ribbon or elastic on instead of using knots. If you'd rather hang than wear this mask, use picture hanging wire instead.


1) With sharp scissors, cut across the mask below the cheeks and nose.
2) Draw a curved long ear from the food boxes. Cut out the ear and use it as a template for the 2nd ear. My animal ears are asymmetrical, so more of the inside shows. There should be a left and right ear. Curve them in half, creasing the bottom. Attach the ears to the top of the mask base using masking tape.
3) With a pencil, on another food box, draw antlers. Cut out the antlers and use it as a template for the 2nd one. Trace the antler reversed onto a food box. Cut out the antler. Using masking tape, attach the antlers between the ears at the top of the mask head. Reposition the ears and antlers as needed. Originally, I had a 2nd set of antlers for a more dramatic look. After being plastered they were too heavy, so I ripped the bigger 2nd set off.

4) Using more food box material and masking tape, form a nose that fits over the human nose and along the slope of the face. This nose will be longer than the fox nose.
5) Rip and twist the newspaper to fit on top of the food box antlers. Overlap intersections, for a smoother flow. Use masking tape to secure the newspaper. The antlers should stand up easily without flopping.

6) Cover your work surface with a plastic tablecloth. Cut the plaster cloth into strips and squares, just like with the fennec fox mask. If you don't like messy hands, put on plastic gloves.
7) Dip a strip into the bowl of water. Using your fingers, squeeze off the excess water while keeping the strip straight. Mold the strip over the mask. Work one strip at a time, until the whole mask, including the ears, nose, and back, is covered with overlapping strips. Use smaller pieces to wrap around the edges and sides. Apply 2 layers of strips, for extra strength, letting the 1st layer dry to the touch before applying the 2nd layer. Use the paper towels to dry off your hands and work surface as needed. Prop the mask up, so air can circulate on all sides. Let fully dry. Depending on how wet the strips are, drying can take 1-2 days. The mask will be lighter and hard once fully dry.

8) Use a paper plate as a paint palette. Using Using Honey Brown, paint the lower head and nose sides. Using Oyster Beige, paint the antlers, nose stripe, and around the eyes. Using Milk Chocolate, paint the upper head, outside the ears, and down the center nose. Using Midnight Blue, paint the inner ears. Using Lamp Black and a small brush, paint the nose. When painting the nose, wrap the paint around the bottom too. Let all of these base layers dry.

9) With Champagne Gold metallic, paint over the Oyster Beige sections. With Worn Penny metallic, paint the Milk Chocolate section. With Emperor's Gold, paint over the Honey Brown sections. With Rich Espresso and small brush, paint a design on the forehead and a stripe down the center nose.

10) With Sapphire Blue, paint the blue inner ears. Let it dry and apply a 2nd coat. Paint the black sections with two coats of Black Ice. Paint the Champagne Gold sections with Champagne Glamour Dust...bet you saw that coming.
11) With Rose Gold and a small flat brush, add symmetrical strips to the horns.

12) Add the ribbon or elastic in the same way as the fox mask.

To enhance the spooky factor, I paired the masks with different capes and black clothing. You could certainly pair your finished mask with one of the many Oriental Trading Halloween Costumes. Instead of an animal, create your own superhero, space explorer, skull, or whatever suits your personality. Check out the variety of Women's Costumes to spark your imagination. I like that they carry a huge variety that are sexy to conservative; with pop culture, literature, and history characters; and even a great variety of plus size options. Whatever you do this Halloween, have fun with it. Happy Makery and Halloween!
SUPPLIES:
Oriental Trading provided me with the cloaks and mask bases. DecoArt provided me with most of their paints that I used. All images, thoughts, opinions, and instructions are my own. Some of these links are Amazon Affiliate links. Any purchases made using those links will result in Amazon paying me a small commision.
- Oriental Trading Ombre Cape Hooded Halloween Costume for Women
- Oriental Trading Black Long Crushed Velvet Cape
- Oriental Trading DIY Paper Mask - They come in a 6 pack. You need 1 per person/spirit animal
- Food boxes - A lot of foods and drinks comes in a thin box...cereal, cake mix, frozen food, soda/beer cans, popcorn, etc
- Masking tape
- Newspaper - Mine was a shipping material
- Dick Blick plaster cloth
- DecoArt Americana Acrylic Paints
- DecoArt Dazzling Metallics Paints
- DecoArt Glamour Dust Paint
- Ribbon or elastic - I used yarn for the photos
- Picture hanging wire - If you'd rather hang these up, use wire instead.
TOOLS:
- Scissors
- Pencil
- Plastic tablecloth
- A bowl of water
- Paper towels
- Plastic gloves - If you don't like getting your hands messy, wear disposable gloves. The plaster scrubs off hands easily
- Paint brushes
- Paper plates
- Cup of water - To rinse brushes between colors
- Phillip's head screwdriver - Something sharp enough to poke holes through the mask.
Fennec Fox Mask
1) With sharp scissors, cut across the mask below the cheeks and nose.
2) Draw a curved long ear from the food boxes. Cut out the ear and use it as a template for the 2nd ear. My animal ears are asymmetrical, so more of the inside shows. There should be a left and right ear. Curve them in half, creasing the bottom. Attach the ears to the top of the mask base using masking tape.
3) Using more food box material and masking tape, form a nose that fits over the human nose and along the slope of the face.
4) Cover your work surface with a plastic tablecloth. Cut the plaster cloth into strips and squares. I keep my strips about 1"-2" wide and cut smaller squares as needed. I like to put my cut strips in a pile. It's easier to cut strips ahead of time instead of while sculpting, as things get messy once sculpting. Excess strips can be stored in a plastic locking bag or closing container. If you don't like messy hands, put on plastic gloves.
5) Dip a strip into the bowl of water. Using your fingers, squeeze off the excess water while keeping the strip straight. Mold the strip over the mask. Work one strip at a time, until the whole mask, including the ears, nose, and back, is covered with overlapping strips. Use smaller pieces to wrap around the edges and sides. Apply 2 layers of strips, for extra strength, letting the 1st layer dry to the touch before applying the 2nd layer. Use the paper towels to dry off your hands and work surface as needed. Prop the mask up, so air can circulate on all sides. Let fully dry. Depending on how wet the strips are, drying can take 1-2 days. The mask will be lighter and hard once fully dry.
6) Use a paper plate as a paint palette. Using Oyster Beige, paint the lower fox face. I painted the inside of the mask with Oyster Beige too, but this isn't necessary. Using Honey Brown, paint the upper head, outside the ears, and inner eye stripes. Using Purple Pizzazz, paint the inner ears. Using Oyster Beige and a small brush, edge paint the ears. Using Lamp Black and a small brush, paint the eyes and nose. Let all of these base layers dry.
7) With Champagne Gold metallic, paint over the Oyster Beige sections. With Emperor's Gold metallic, paint the Honey Brown sections. Go over the upper head section with Bronze metallic paint, leaving a strip of Emperor's Gold showing.
8) Mix equal parts Purple Passion and Purple Princess Glamour Dust together on the plate. Cover the purple inner ears with the glitter paint mixture. Let it dry and apply a 2nd coat. Paint the black sections with two coats of Black Ice. Paint the Champagne Gold sections with Champagne Glamour Dust...bet you saw that coming.
9) Using the screwdriver, gently pierce small holes through the mask sides. Insert ribbon or elastic through the holes. For elastic, try the mask on, and adjust the elastic to fit snug enough for the mask to stay on easily. For ribbon, put the mask on and decide how long the two ribbon pieces should be for the mask to tie in the back. Tie knots on the mask to secure the ribbon or elastic to itself. If this mask will get a lot of wear, consider sewing the ribbon or elastic on instead of using knots. If you'd rather hang than wear this mask, use picture hanging wire instead.
If you want to try a more challenging sculpture, create the next mask, or another creature with bigger dimensions.
Deer Mask
1) With sharp scissors, cut across the mask below the cheeks and nose.
2) Draw a curved long ear from the food boxes. Cut out the ear and use it as a template for the 2nd ear. My animal ears are asymmetrical, so more of the inside shows. There should be a left and right ear. Curve them in half, creasing the bottom. Attach the ears to the top of the mask base using masking tape.
3) With a pencil, on another food box, draw antlers. Cut out the antlers and use it as a template for the 2nd one. Trace the antler reversed onto a food box. Cut out the antler. Using masking tape, attach the antlers between the ears at the top of the mask head. Reposition the ears and antlers as needed. Originally, I had a 2nd set of antlers for a more dramatic look. After being plastered they were too heavy, so I ripped the bigger 2nd set off.
4) Using more food box material and masking tape, form a nose that fits over the human nose and along the slope of the face. This nose will be longer than the fox nose.
5) Rip and twist the newspaper to fit on top of the food box antlers. Overlap intersections, for a smoother flow. Use masking tape to secure the newspaper. The antlers should stand up easily without flopping.
6) Cover your work surface with a plastic tablecloth. Cut the plaster cloth into strips and squares, just like with the fennec fox mask. If you don't like messy hands, put on plastic gloves.
7) Dip a strip into the bowl of water. Using your fingers, squeeze off the excess water while keeping the strip straight. Mold the strip over the mask. Work one strip at a time, until the whole mask, including the ears, nose, and back, is covered with overlapping strips. Use smaller pieces to wrap around the edges and sides. Apply 2 layers of strips, for extra strength, letting the 1st layer dry to the touch before applying the 2nd layer. Use the paper towels to dry off your hands and work surface as needed. Prop the mask up, so air can circulate on all sides. Let fully dry. Depending on how wet the strips are, drying can take 1-2 days. The mask will be lighter and hard once fully dry.
8) Use a paper plate as a paint palette. Using Using Honey Brown, paint the lower head and nose sides. Using Oyster Beige, paint the antlers, nose stripe, and around the eyes. Using Milk Chocolate, paint the upper head, outside the ears, and down the center nose. Using Midnight Blue, paint the inner ears. Using Lamp Black and a small brush, paint the nose. When painting the nose, wrap the paint around the bottom too. Let all of these base layers dry.
9) With Champagne Gold metallic, paint over the Oyster Beige sections. With Worn Penny metallic, paint the Milk Chocolate section. With Emperor's Gold, paint over the Honey Brown sections. With Rich Espresso and small brush, paint a design on the forehead and a stripe down the center nose.
10) With Sapphire Blue, paint the blue inner ears. Let it dry and apply a 2nd coat. Paint the black sections with two coats of Black Ice. Paint the Champagne Gold sections with Champagne Glamour Dust...bet you saw that coming.
11) With Rose Gold and a small flat brush, add symmetrical strips to the horns.
12) Add the ribbon or elastic in the same way as the fox mask.
To enhance the spooky factor, I paired the masks with different capes and black clothing. You could certainly pair your finished mask with one of the many Oriental Trading Halloween Costumes. Instead of an animal, create your own superhero, space explorer, skull, or whatever suits your personality. Check out the variety of Women's Costumes to spark your imagination. I like that they carry a huge variety that are sexy to conservative; with pop culture, literature, and history characters; and even a great variety of plus size options. Whatever you do this Halloween, have fun with it. Happy Makery and Halloween!
Comments
Post a Comment