
HAIR ACCESSORY TUTORIAL: Crafty Chica Sugar Skull Fascinator

If you've been following me for a while, you know I've written many tutorials on many things, but never on hair accessories. That might seem odd since that's what I sell in my shop, Azurafae, but why would I share my construction secrets? For this I thought, I should share a few construction secrets for something that I normally only make for myself or friends. If you are familiar with my fabric hair accessories, you know that I hate using glue and sew them, because they are more secure that way, and the final product looks nicer. This project is is departure from the mostly gothic fascinators or bridal veils that I make for myself or friends. I love the colorful sugar skulls, so I wanted to do this sugar skull justice and keep the hair piece very colorful. Dia de los Muertos is soon, so get into the spirit and make a sugar skull fascinator!
SUPPLIES:
Most of these supplies I bought at Michael's. If you can't find the exact items, I'm sure something comparable will be there. If not, Etsy is also a great resource for supplies.
Click the image to enlarge

- One large Sugar Skull applique from the Crafty Chica line at Michael's. Click here to see if a Michaels store in your area is carrying the Crafty Chica line. There are 3 in this package. I used the large blue one. I'll show you what I did with the other two in a different post
- Black felt - You want 1 sheet of it, because you'll be cutting out several skull shapes for the various layers of construction
- Red, Purple, and White fluffy feathers - These came in a mixed bag of feathers that I bought years ago. There were other colors and types of feathers in it. I chose these colors, because they pulled colors from the sugar skull
- Blue Biot feathers - I originally bought these for to put in my hair, but I've never used them for that in the year since I bought them. I purchased these turquoise and royal blue biot feathers from Magpie's Eye on Etsy. I've only seen red, and black ones at my Michael's, but the stock varies per store
- Blue, Red, Clear, and Yellow seed beads - I apologize for not remembering the size of these. They are a large size. These came in a mixed color bag of seed beads, all in one size. I chose these color because they complimented the colors of the sugar skull
- Black thread - This is an all purpose thread. Using a thread that matches the felt and the edge color of the patch, helps hide your stitches when sewing
- Hand sewing needles - No particular type is needed. Just a couple that feel comfortable to sew with
- 43x5mm black alligator clips - A purchased these from Etsy, because I use a lot of alligator clips for hair accessories and must buy them in bulk. I have seen a variety of basic hair clips like this at Michael's recently. I find alligator clips to work best in many hair types. They hold on to hair well and are easy to use
- Ball long straight pins - I prefer the straight pins with the colorful ball ends to the normal straight pins with flat ends. They are easier to work with because they are long and the ball helps with handling them
- Large scissors - For cutting the felt
- Small scissors - For cutting thread ends precisely after knotting off on the piece
INSTRUCTIONS: Click on any of the images to enlarge them, if needed.
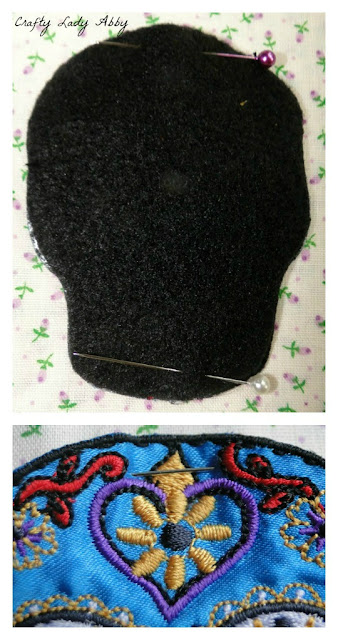
1) Lay the applique on the black felt, near the edge, and cut around the applique with the large scissors. For a precise cut, use the small scissors to cut close to the shape. It's better to be slightly smaller than too large. Try to follow the exact shape if possible. I noticed the applique had a little bit of double-sided tape on the back, where it had attached to the paper packaging. I used this to my advantage to keep the applique still while cutting. Do this a total of 3 times. You will use all three for this project.

2) Sort the fluffy feathers by color and size. I did a general large and small. I didn't use all of the feathers I had pulled for this project, but I did use at least one of each size and color.

3) On a flat surface, arrange your feathers in shape you find pleasing. Lay the applique gently on the arrangement to check for feather placement. I did a layered fan shape. I tried a few pattern variations before settling on this one. With that being said, in my experience, my finial placement of them is always tighter than the lay out. It's important to do this lay out step before sewing them down. It's hard to remove the stitching carefully if you misplace a feather.

4) Thread your needle with a long piece of black thread. Tie the two ends together twice, so the second knot is on top of the first. Starting on the back of one black felt skull, start hand sewing the 1st feather from your layout. I start from the top of the stack of feathers, and move towards the back, so I can have more control over the placement of the feathers. Stitch across the quill and up the shaft trying not the crush the feather barbs (the fluffy part) if possible. If you look closely at the left photo, you will see that I sewed through the quill in some places. This will keep the feathers stable better. Always check the front for placement, as this is what will show when the piece is worn. When your doubled strand of thread runs low, slip the needle through the felt on the front, and knot it off. Use the small scissors to trim the tail semi-close to the thread. Continue doing this process to each feather until they are all attached. The back will look like the bottom right photo when you are done. This work will be hidden later on, so don't worry if it's not very neat. As long as the feathers are very secure, you are fine.

5) With the small scissors closed, pull them along the hard edge of one biot feather. This will curl it, much like you would curl thin plastic ribbon. Gently do this several time to each feather, until the curl is sufficient for you...or until it won't curl more. I found that the turquoise biot feathers curled easier and more than the royal blue ones. I curled 6 royal blue and 4 turquoise. You can curl as many as you would like. I felt this was a great amount to decorate the sides of the skull.

6) The same as what you did with the fluffy feathers before attaching them, you want to lay out the curled biot feathers. Do this lay out on top of the black felt skull with the fluffy feathers attached. Because they are so curly and now springy, they won't look exactly like your layout when you sew them on. Actually, they will probably look nicer once attached. Again, lay the applique on top of the layout, to figure out the basic layout. I decided on putting three royal blue curled biot feathers below two turquoise curled biot feathers, on each side. I liked the fullness and that the turquoise ones overlapped the sugar skull applique.

7) On the front of the black felt with the fluffy feathers attached, you will sew on the curled biot feathers one at a time. Starting with the royal blue biot feathers, close to where the red fluffy feathers stop, sew one feather onto the felt, using the same method you did for the fluffy feathers. Do this for all of the royal blue feathers on both sides. Try to keep them evenly spaces and placed on both sides...left and right. After those are attached, sew on the turquoise curled biot feathers, placing them in between the royal blue curled biot feathers. After you are finished, they should look something like the top photo for this step. The left photo shows the felt side with the fluff feathers. The right photo shows the felt side with the biot feathers, the top side.

8) Take a break from the feather sewing, we'll do something less tedious to stabilize the sugar skull applique. Line up one of the black felt skulls with the back of the applique. Use two of the ball long straight pins to temporarily secure the two pieces, by gently inserting the pins through the felt and applique. The applique is made with a satin fabric and a lot of decorative embroidery, so be very careful with your placement of the pins.
9) Thread your needle and knot the thread ends the same way as you have before. Starting at the back, where the felt is, make small stitches around the edge of the applique, following the black embroidered border. You only need to make one pass, but make sure each stitch is passing through both layers...the felt and the applique. Adding the felt to the back of the applique helps stabilize it and will help soften the layers, preventing the felt layer with feathers from being bumpy through the applique. Layers are your friend with this sort of work.
OPTIONAL: If you want it even more stiff, you can sandwich a slightly smaller skull shaped piece of buckram fabric between the applique and felt skull. If you don't know what buckram fabric is, ask an employee at your local fabric store. It's basically a white cotton with a stiffening agent added to it. It's in the utility fabric section. It's normally used to stiffen the hems of custom curtains, and in millinery (hat making).

10) Grab the 4 different colors of seed beads. Thread your needle, and tie the ends together in a double knot. At the bottom/jaw line of the feathered felt skull, make a few stitches into the felt at one edge (where you see the red). String on many red seed beads. I didn't have a set amount to add, since they are irregular sized beads. I just added enough to make a long loop that I liked. After stringing the beads to your desired length, make a few stitches into the felt at the opposite edge. Then, with that same connected piece of thread, or a new one if you were using a short piece, run the needle back through all of the red beads back to the starting place. This will strengthen the strand of beads and keep them very straight. Do this same stitching, stringing, and strengthening technique for the other 3 colors of beads (though clear is obviously not a color...but you get what I mean), moving slightly inwards from the previous row. You're stitches don't have to be neat, but they do need to be plentiful and secure. Your stitches will be covered in the next two steps.

11) On the back of the feathered felt skull, where you stitched on the fluffy feathers, pin one of the additional black felt skulls. With your needle threaded, and thread knotted, carefully stitch through the two pieces of felt around the perimeter of the skull. The hardest part is where the feathers are, because you need to dodge the shafts and quills. Just take your time and carefully shift the feathers as you go. You'll only need to make one pass of stitching. You'll reinforce the edge in the next step.

2) Sort the fluffy feathers by color and size. I did a general large and small. I didn't use all of the feathers I had pulled for this project, but I did use at least one of each size and color.

3) On a flat surface, arrange your feathers in shape you find pleasing. Lay the applique gently on the arrangement to check for feather placement. I did a layered fan shape. I tried a few pattern variations before settling on this one. With that being said, in my experience, my finial placement of them is always tighter than the lay out. It's important to do this lay out step before sewing them down. It's hard to remove the stitching carefully if you misplace a feather.

4) Thread your needle with a long piece of black thread. Tie the two ends together twice, so the second knot is on top of the first. Starting on the back of one black felt skull, start hand sewing the 1st feather from your layout. I start from the top of the stack of feathers, and move towards the back, so I can have more control over the placement of the feathers. Stitch across the quill and up the shaft trying not the crush the feather barbs (the fluffy part) if possible. If you look closely at the left photo, you will see that I sewed through the quill in some places. This will keep the feathers stable better. Always check the front for placement, as this is what will show when the piece is worn. When your doubled strand of thread runs low, slip the needle through the felt on the front, and knot it off. Use the small scissors to trim the tail semi-close to the thread. Continue doing this process to each feather until they are all attached. The back will look like the bottom right photo when you are done. This work will be hidden later on, so don't worry if it's not very neat. As long as the feathers are very secure, you are fine.

5) With the small scissors closed, pull them along the hard edge of one biot feather. This will curl it, much like you would curl thin plastic ribbon. Gently do this several time to each feather, until the curl is sufficient for you...or until it won't curl more. I found that the turquoise biot feathers curled easier and more than the royal blue ones. I curled 6 royal blue and 4 turquoise. You can curl as many as you would like. I felt this was a great amount to decorate the sides of the skull.

6) The same as what you did with the fluffy feathers before attaching them, you want to lay out the curled biot feathers. Do this lay out on top of the black felt skull with the fluffy feathers attached. Because they are so curly and now springy, they won't look exactly like your layout when you sew them on. Actually, they will probably look nicer once attached. Again, lay the applique on top of the layout, to figure out the basic layout. I decided on putting three royal blue curled biot feathers below two turquoise curled biot feathers, on each side. I liked the fullness and that the turquoise ones overlapped the sugar skull applique.

7) On the front of the black felt with the fluffy feathers attached, you will sew on the curled biot feathers one at a time. Starting with the royal blue biot feathers, close to where the red fluffy feathers stop, sew one feather onto the felt, using the same method you did for the fluffy feathers. Do this for all of the royal blue feathers on both sides. Try to keep them evenly spaces and placed on both sides...left and right. After those are attached, sew on the turquoise curled biot feathers, placing them in between the royal blue curled biot feathers. After you are finished, they should look something like the top photo for this step. The left photo shows the felt side with the fluff feathers. The right photo shows the felt side with the biot feathers, the top side.

8) Take a break from the feather sewing, we'll do something less tedious to stabilize the sugar skull applique. Line up one of the black felt skulls with the back of the applique. Use two of the ball long straight pins to temporarily secure the two pieces, by gently inserting the pins through the felt and applique. The applique is made with a satin fabric and a lot of decorative embroidery, so be very careful with your placement of the pins.

9) Thread your needle and knot the thread ends the same way as you have before. Starting at the back, where the felt is, make small stitches around the edge of the applique, following the black embroidered border. You only need to make one pass, but make sure each stitch is passing through both layers...the felt and the applique. Adding the felt to the back of the applique helps stabilize it and will help soften the layers, preventing the felt layer with feathers from being bumpy through the applique. Layers are your friend with this sort of work.
OPTIONAL: If you want it even more stiff, you can sandwich a slightly smaller skull shaped piece of buckram fabric between the applique and felt skull. If you don't know what buckram fabric is, ask an employee at your local fabric store. It's basically a white cotton with a stiffening agent added to it. It's in the utility fabric section. It's normally used to stiffen the hems of custom curtains, and in millinery (hat making).

10) Grab the 4 different colors of seed beads. Thread your needle, and tie the ends together in a double knot. At the bottom/jaw line of the feathered felt skull, make a few stitches into the felt at one edge (where you see the red). String on many red seed beads. I didn't have a set amount to add, since they are irregular sized beads. I just added enough to make a long loop that I liked. After stringing the beads to your desired length, make a few stitches into the felt at the opposite edge. Then, with that same connected piece of thread, or a new one if you were using a short piece, run the needle back through all of the red beads back to the starting place. This will strengthen the strand of beads and keep them very straight. Do this same stitching, stringing, and strengthening technique for the other 3 colors of beads (though clear is obviously not a color...but you get what I mean), moving slightly inwards from the previous row. You're stitches don't have to be neat, but they do need to be plentiful and secure. Your stitches will be covered in the next two steps.

11) On the back of the feathered felt skull, where you stitched on the fluffy feathers, pin one of the additional black felt skulls. With your needle threaded, and thread knotted, carefully stitch through the two pieces of felt around the perimeter of the skull. The hardest part is where the feathers are, because you need to dodge the shafts and quills. Just take your time and carefully shift the feathers as you go. You'll only need to make one pass of stitching. You'll reinforce the edge in the next step.

12) Flip the piece over to the front, where the blue curled biot feathers are attached. Line the felt backed skull applique up with the front of the feathered piece. Pin twice on the back, like you did in the previous step. With your needle threaded, and your thread ends knotted, start your stitch between the non-attached layers, to hide the tail. You will make your stitches through all 4 layers (the applique + 3 felt skulls) filling the stitching space from the 1st round of stitching on the applique. This will create a solid line of stitching and help the stitching blend into the black embroidered boarder of the applique. The back probably won't look as neat, but this is why I make sure my thread matches the felt color. Plus the back is well the back, and will be against your head. However, make it as neat as possible, and take your time. Again, stitching where the feathers are is a tedious process, as feathers are delicate and temperament. Take your time, and you won't have to rip out your stitching and do it again...yeah. Not that I did that, but just saying that this step is super important.

13) Time to add the clips. I sew all of my clips to felt in this same way that I'll share with you. I've never had a problem with one loosening up after a lot of wearing, which is fantastic. The photos are for attaching the small ends. Hopefully just describing how I attach the large ends. To start with, thread your needle with a long piece of thread, and double knot the ends. It's best to sew one clip with one continuous piece of thread. Where the feathered section is, center a clip against the felt backing. Where the thick spring part of the clip is, slip the needle below it, through that top layer of felt. It's ok if it goes a little deeper, but definitely not through the applique! Pull the thread through until the knot stops it from passing through the felt. Slip the needle through the opening of the clip, by the spring. There is a groove before the teeth of the clip start, and this is a perfect place for the stitching to lay. Do this several times, until the clip doesn't wiggle much. It can wiggle a little, and the next part will secure it completely. Slip your needle behind the section of stitches, by the felt, and make a knot. Don't cut the thread!
Ok, with photos this time...sorry about that, I was eager to finish sewing, and wear it!
(A) Slip your needle through the felt beside the clip, almost to the end.
(B) Gently open the clip. Two teeth back from the end, lay the thread over the valley. Shut the clip.
(C) Slip your needle through the felt under the clip. Repeat B and C several times until the clip doesn't wiggle.
(D) Slip your needle behind the stitches, beside the clip. Make a knot. Do this again. Cut the thread tail close to the knots.
Repeat step 13 for the 2nd clip. You WILL need two clips, because of the weight of the finished piece...mostly the beading. This will help a lot in keeping the fascinator still in your hair.

YOU ARE FINISHED. Celebrate by putting this promptly in your hair, or the person closest to you with hair long enough to hold this fascinator in! I put it in my own hair. Now, to figure out where to wear it...

Disclosure:
I received these complimentary Sugar Skull appliques from CraftyChica.com as part of the Crafty Chica Design Team, and was asked to share an original DIY project.
wow adorable project :D
ReplyDeleteThanks. I'm hope it's easy enough to follow.
DeleteBrilliant! It is so lovely!
ReplyDeleteThanks. It was easy to make. You should give it a try.
DeleteRad & Inventive Design! Love it! :)
ReplyDeleteThanks! I'd love to see your own take on it!
DeleteHi Abby,
ReplyDeletePlease can you tell me where I can buy the clips you have used in this post for the fascinators? My email is cindyfisherx@gmail.com
Please read the post, especially the supply list. I have indicated there where I purchased them.
Delete