
Skull-A-Day 4.0 - Tutorial - #23 Sugar Skull Make-up
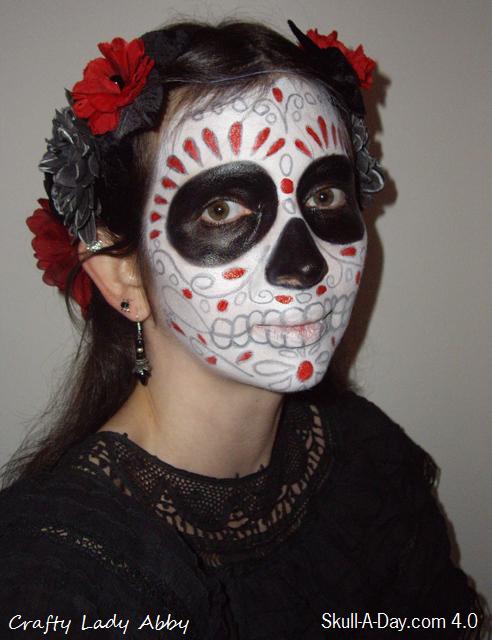
As you saw on my Dia de la Abby post, I did Sugar Skull make-up for Halloween. For the tutorial, I have provided a product and tool list, as well as some basic instructions. I have provided many video tutorials made by other make-up enthusiast. These should provide a source of more inspiration as well as help you learn how to apply your skull make-up, or what ever other fantasy make-up these might inspire you to do. I recommend reading the entire post before attempting.
Time: This took me about an hour and a half to do, so allot for at least that amount of time or more, if you have never done this before.
Product List:
- Black eyeliner pencil - For tracing out the black areas of your design and the details
- Ben Nye white cream make-up - For the white base
- Ben Nye black cream make-up - For the black nose and eyes
- Ben Nye red cream make-up - For the red details
The brand Ben Nye is stage grade make-up. Mine are in small pots, but you can get them in split pots with multiple colors. I prefer them separate, because I like using makeup sponges and don't want to risk the colors mixing
Tools:
- Foam make-up sponge triangles - For applying the cream makeup in large areas
- Cotton swabs (Q-tips) - To refine small areas or if you don't want to get cream make-up on your good brushes
- Make-up brushes - Small pointy and small flat
- Eyeshadow applicator - For applying the powders to set the cream make up
- Eyeliner pencil sharpener - You will need this sharpen your eyeliner pencil while working on the details
- Toilet paper or a paper towel - To clean off the eyeliner pencil
OPTIONAL...should you have time...
- White baby powder - For setting the white cream make-up
- Black eye shadow - For setting the black cream make-up
- Other colors of eyeliner pencils - For multi color decorations
- Other colors of cream make-up - For multi color decorations
- Jewels, loose glitter - Should you want a little sparkle
- Feathers and fabric flower petals - If you want some 3D decorations
- Tweezers - These are for applying the jewels
- Eyelash glue - For applying the jewels, glitter, feathers and fabric flower petals
- Small scissors - For cutting down the feathers and flower petals
Instructions:
1) Using the black eyeliner pencil, draw around your orbital bone (eye socket). Go above your eyebrows, because the black cream makeup covers your eyebrows better than the white. If you mess up, wipe off the error. You want to make sure you get this part right, because it's hard to correct after applying the black cream make-up...more on that in another step...
2) Using the black eyeliner pencil draw around your nose. You will follow around the bottom and sides of your nose. Make sure the top doesn't connect to the eyes. Again, if you make a mistake, this is the time to correct it.
3) Using the white cream make-up and the triangle sponge, to apply the white areas evenly. Blend around your hair line and jaw line.
3) Using the white cream make-up and the triangle sponge, to apply the white areas evenly. Blend around your hair line and jaw line.
OPTIONAL: Using a triangle sponge or a large brush and white baby powder, apply the baby powder to set your white makeup. Put extra under the eye, nose and mouth area...you will brush this off later.
4) Using the small flat brush, fill in the black areas. Paint slow and careful around the outline. For the nose, you will paint under your nose too.
OPTIONAL: Using black loose or pressed eyeshadow and an eyeshadow applicator or small brush, apply the eyeshadow to your black make-up to set it. Some might fall onto your white make up. If you have put the extra white powder, you should be able to easily dust off the fallen black shadow.
5) You will be using the eyeliner pencil for the next few steps. You will need to resharpen your pencil when it gets dull...and it will. You will also have to gently clean it off, as it will change color after having contact with the white make up.
6) Suck in your cheeks...think fishy face. Draw tear drop shapes along your sunken jaw. Try to make them even on both sides. Should you mess this up (I had to fix mine), use the white make-up and sponge to gently "erase" the mistake.


You can see the jaw tear drops best on this side view. You can also see my hair flowers.

7) Draw lines from the end of the tear drop, to the corner of your mouth. Some of the teeth will go on these lines.
You can see the connection in this angled view.

8) Starting with the center of your mouth, draw "U" shapes for teeth. Obviously the top row will be upside down "U"s. You want to make sure the teeth are large enough to go above and below your lips. For each row, I have 6 teeth across my mouth and 2 on each side of my mouth. You can have what ever amount you choose, but try to keep them even in size and spacing.
You can see the teeth best in this front view.

9) Now that you have the basic part done, it's time for the decorations. I drew tear drop shapes for the petals around the top and outside of my eyes, as well as other areas for petals and leaves. I drew swirls and circles along my cheek bones, jaw line, and forehead.
OPTIONAL: If you want some added color, you can use other colors of eyeliner pencil to do this part.
10) Using the small pointed brush and the red make-up, carefully paint in different areas that you have drawn. I painted in most of the petals. I tried to keep the color evenly places.
OPTIONAL: Use other colors of cream make-up to fill in the drawn areas,
11) OPTIONAL: Apply a small amount of eyelash glue to the backs of jewels. Using tweezers, pick up the jewels and press them on your face.
12) OPTIONAL: Using the small pointed brush, to apply eyelash glue to different areas of your face. Using the same brush, apply glitter on top of the glue.
Another method is squirting some glue on a piece of plastic, pouring some glitter on that, mixing it together and then applying it. Just make sure that you don't put too much glitter in the mix or the glue won't be sticky. Easy fix, add more glue.
13) OPTIONAL: Using the small scissors, cut down the feathers and fabric flower petals so they will fit around your eyes. I suppose you could put them other places, but this is the area that normally looks the best.
For the feathers, apply eyelash glue along the quill of the feather. Then, press the feather on your face. Hold the feather in place for a few minutes until it sticks.
For the petals, look at the back side of the petal. Apply glue on the area that will touch your face. Then, press the petal on your face. Hold the petal in place for a few minutes until it sticks.
As with any makeup, it's about experimentation. I chose my placement of design based on my own designs, so I didn't plan it out. You can use these pictures as a reference for how a human skull looks from the front and side. These will help with placement. Feel free to print them out and sketch out your make-up before applying it. I use this if I'm doing something that I feel needs planning out.


(Ignore the non-english words. I've had these saved on my computer for a while, so I don't remember where they came from.)
Additional Photos of my costume:
You can see part of my vintage Mexican dress and my faux leather underbust corset. I was wearing PVC Mary Jane shoes and no stockings. My drop earrings are by Veronica Roo's Valuables. My stud earrings are spiders. I made my hair flowers. They are 7 flowers total. The flowers are clipped along the braided ring of my hair. My technique for making these particular flowers is a secret. However, I have written two posts about making other hair flowers...Post 1 and Post 2. There are many varieties included.

John and I before the show started. I'll post photos of John and Alex's costumes later today. They both have skull like make-up too, just different from mine.

Video Tutorial List: I like watching the videos for make-up more than just reading about it.
- Sugar Skull - You can change up the colors and decorations
- Sugar Skull inspired by Sylvia Ji's artwork - You can change the colors and decorations. You can skip the necklace.
- Sugar Skull - Again, you can change the colors and decorations
- Sugar Skull inspired by Sylvia Ji's painting "Purple Crush" - This make-up artist Goldie Starling also has a lot of other great make-up tutorials. I suggest viewing her other tutorials too.
- Sugar Skull inspired by Sylvia Ji's artwork - She doesn't mention what products she used, but I did see that for the black line work, she was using MAC liquid eyeliner. This video shows the model in full costume, which should give you some inspiration on what to wear with your skull make-up.
- Black and White Sugar Skull on a Guy - You can add color if you want, but I like the use of black and white only to give a more masculine feel to a sugar skull.
You-Tube has a lot more make-up tutorial videos. I always do searches for make-up tutorials when I need some costume related make-up help. It's a great resource tool.
Ok that is all for now, happy makery!
Comments
Post a Comment